Introduction
This article describes how I set up a Navidrome Music server using a Raspberry Pi (3).
Just for fun.
This article describes how I set up a Navidrome Music server using a Raspberry Pi (3).
Just for fun.
I used to have a Madsonic music server, which stopped working when I upgraded the Linux distro of the RPI to Bookworm. I'm pretty certain that the reason was the java version. Madsonic needed version 8, but it wasn't available for me to install any more.
I asked my friendly neighbourhood ChatGPT if it could recommend a new music streamer that I could use to listen to my own music.
ChatGPT was kind enough to generate a table of various products, compare the features and voila! There was Navidrome.
I found the installation instructions on the Navidrome website, and an alternatie method on Pi My Life Up.
But I decided to do something different and see how far I could get with ChatGPT, so I asked it to create instructions for me to get Navidrome working on my RPI.
The initial instructions were pretty straightforward, but I also had discussions with the tool to clarify some steps, or explain ideas that weren't clear to me.
Below are the results of my discussions with ChatGPT
The RPI Imager Tool was very helpful in getting this done:
username.password./etc/os-release command to confirm I had installed bullseye.Set up the RPI LAN like so:
sudo raspi-config.OK and exit the config menu.ifconfig to check that the wireless interface is now connected.wlan0 has an IP address.This would be a good time to complete some other configurations:
sudo raspi-config.Take the opportunity to update the RPI before continuing.
> apt-get update
> apt-get upgrade
Reboot the RPI.
Using static IPs is not good practise.
A better solution is to define the hostname of the RPI on the network router and use the same name in PuTTY to connect to the RPI remotely.
Ensure your system is up to date and install ffmpeg:
> sudo apt update
> sudo apt upgrade
> sudo apt install vim ffmpeg
Run the following command:
> sudo useradd -r -s /bin/false navidrome
This will:
check if the user exists by typing this at the prompt:
> id navidrome
You should see something like this:
> uid=999(navidrome) gid=992(navidrome) groups=992(navidrome)
Run these commands to ensure the directories exist:
> sudo mkdir -p /var/lib/navidrome
> sudo mkdir -p /media/usb # Adjust if needed for your USB mount
-p ensures that the directories and any missing parent directories are created.
Now, make sure Navidrome owns its required directories:
> sudo chown -R navidrome:navidrome /var/lib/navidrome
> sudo chown -R navidrome:navidrome /media/usb # Adjust if needed
Once this is done, you can continue with the installation.
We're assuming that your music (MP#, etc.) is on a USB-drive, connected directly to your RPI.
Since you're using a headless Debian Bookworm setup, you need to properly configure your USB drive so that it automounts and is accessible after every reboot.
Plug in your USB-dive and identify it by running:
> lsblk
Look for your USB device. It will likely be named something like /dev/sda1.
Choose a permanent location to mount the USB-drive:
> sudo mkdir -p /media/usb
Get the UUID of your USB drive with:
> ls -l /dev/disk/by-uuid/
You will see an output similar to this:
> lrwxrwxrwx 1 root root 10 Mar 1 20:59 1234-5678-ABCD -> ../../sda1
Add the USB-Drive to fstab (Permanent Mount). Edit the /etc/fstab file:
> sudo nano /etc/fstab
For exFAT or FAT32 drives, add this line at the bottom of the file:
> UUID=1234-ABCD /media/usb vfat defaults,nofail 0 2
Save and exit (ctrl-O, ctrl-X)
Test if the mount works without a reboot by typing: sudo mount -a
This last command won't return anything if things go as planned.
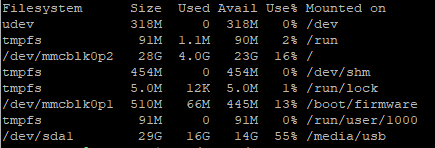
Then type df -h to see a listing of mounts. Here, the USB is on the last row:
Then check: ls /media/usb
If you see your media files, then the setup is correct.
Reboot the RPI with sudo reboot
After the restart, check again with: ls /media/usb
Download the latest release from the releases page, extract the contents to the executable directory, and set the permissions for the files. (Replace the URL below with the one from the releases page):
> wget https://github.com/navidrome/navidrome/releases/download/v0.54.5/navidrome_0.54.5_linux_arm64.deb
Before you install, you can check that you have a valid Debian file by typing:
> file navidrome_*.deb
and look for this output:
> navidrome_0.50.1_Linux_armv7.deb: Debian binary package (format 2.0)
Navidrome should now be installed as a systemd service. Run:
> sudo systemctl enable navidrome
> sudo systemctl start navidrome
And check the status with:
> sudo systemctl status navidrome
If it says active (running), then you're good.
If it says active (exited), then try to restart with:
> sudo systemctl restart navidrome
The config.toml file is Navidrome's main configuration file, used to set various options such as the music folder location, port number, logging options, transcoding settings, and user authentication.
In the working directory, /var/lib/navidrome create a new file named navidrome.toml with the following settings.
> sudo nano /etc/navidrome/navidrome.toml
Add the following line in the file. Adjust the path as necessary.
                        MusicFolder = "/mnt/usb"

                        Address = "0.0.0.0"

                        Port = 4533
Type the following commands:
> sudo systemctl daemon-reload
> sudo systemctl start navidrome.service
> sudo systemctl status navidrome.service
If the service started correctly, verify you can access http://localhost:4533, of if using the browser on another computer, type: http://hostname.local:4533
To configure Navidrome to start automatically on a reboot, type:
> sudo systemctl enable navidrome.service
A UUID (Universally Unique Identifier) is a unique identifier assigned to a filesystem or partition on a storage device. It ensures that even if the device name (e.g., /dev/sda1) changes, the system can still recognize and mount the correct partition reliably. For example, if you plug in multiple USB drives, Linux may change their order (/dev/sda1, /dev/sdb1, etc.), but the UUID remains the same, allowing consistent identification.
TOML (Tom's Obvious, Minimal Language) is a configuration format similar to INI but more structured and easier to read.